OLED and SD Card - Page 4
I've explained how the OLED display, the SD card and how the FAT32 file allocation system works but now it's time to link them all together. After the initialisation of the LCD and the SD card it is now time to locate the file on the card, there are two ways of doing this. We can either read the card like an operating system would and work it's way to the file or since we know the cluster offset we can just go straight to it. Jumping straight to an offset is a fast method but that's assuming the cluster offset will never change, if it does then we will never get the required result.
The other method is to follow our file paths, so to get to image CAT2 we must follow Root Directory > ENGINE > PICTURES > CAT2. For this project I'm not going to write out an operating system and display the options, I'm just going to rely on the folder paths from reading the SD card in my computer.
Root Directory
The first address we want to locate to is the root directory, this starts at sector 16384, so we would assume we go to this address for our SD card, this is not the case. There are a number of hidden sectors which are labeled in the boot sector, 1C to 1F, this translates to 8192 decimal. So if we want to get to sector 16384 we must add 8192 to it to find our address, 24576.

The first step is to send our command 18 which starts the reading process. The address values in the argument will depend on where we want to read from, but say for example we want the root directory then they would be loaded with 00006000. Once our command has been sent we keep sending the NCR until we receive the start token, the next 512 bytes after that will be our data. Two variables are loaded which will equate to a counter of 512, this is explained in the next section of program.
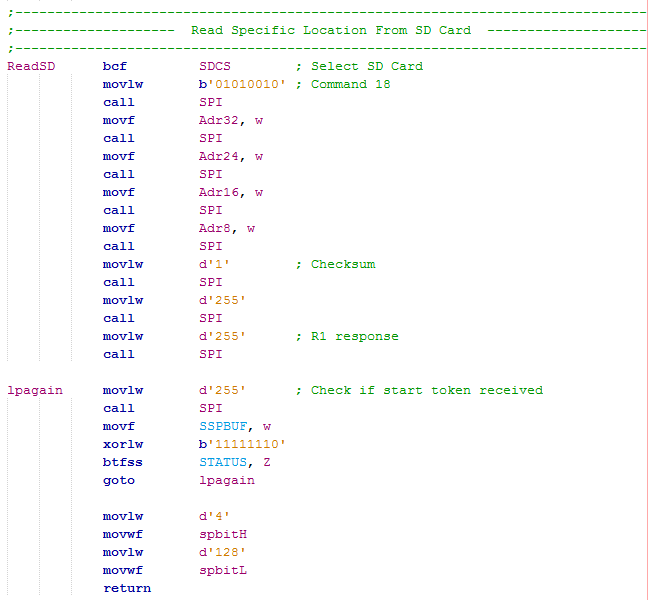
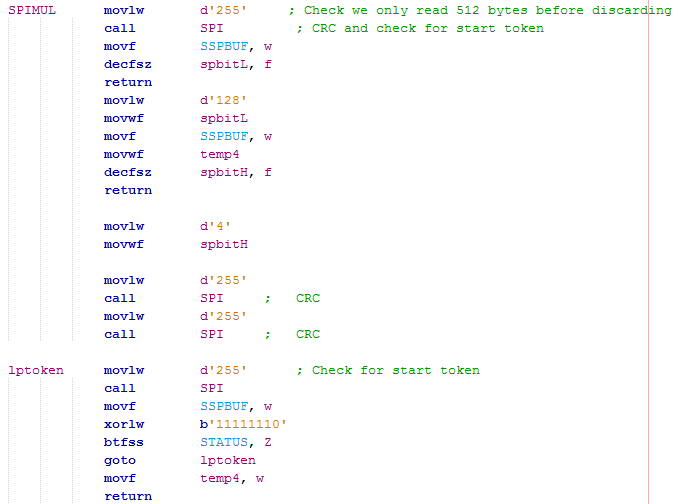
Every 512 bytes of data we will end with two CRC's and then we want to start the process again. Instead of calling the SPI program we now call "SPIMUL" which will call SPI and then decrement a counter system before returning with the SPI buffer value in the working register. Once a total of 512 calls have gone to this program it will skip to deal with the CRC's and then finally looping until we get the start token again. Before dealing with the CRC's we first loaded the SPI buffer into a temporary variable (temp4) which after the start token is received is loaded back into the working register, to ensure we don't loose the 512th byte.
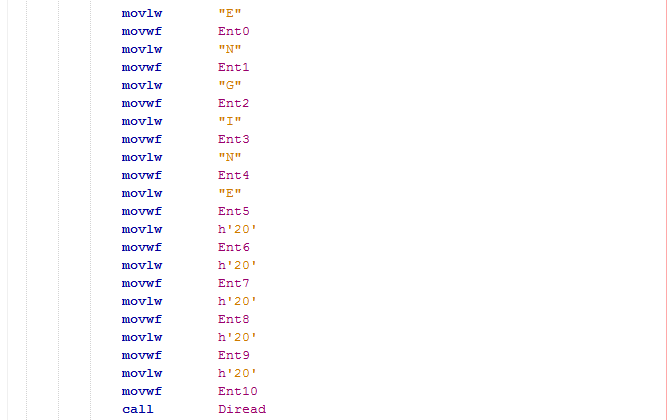
We have sent the directory location to our SD card and arrived at that destination. Before going any further in that destination we need an entry to look for, the only one should be "ENGINE" which I have assigned to eleven variables as there is a maximum of eleven characters to go in our 32-bit entry. All the other characters should be set at hex 20, care must be taken as the last three characters of the image files will have "BMP" in them.
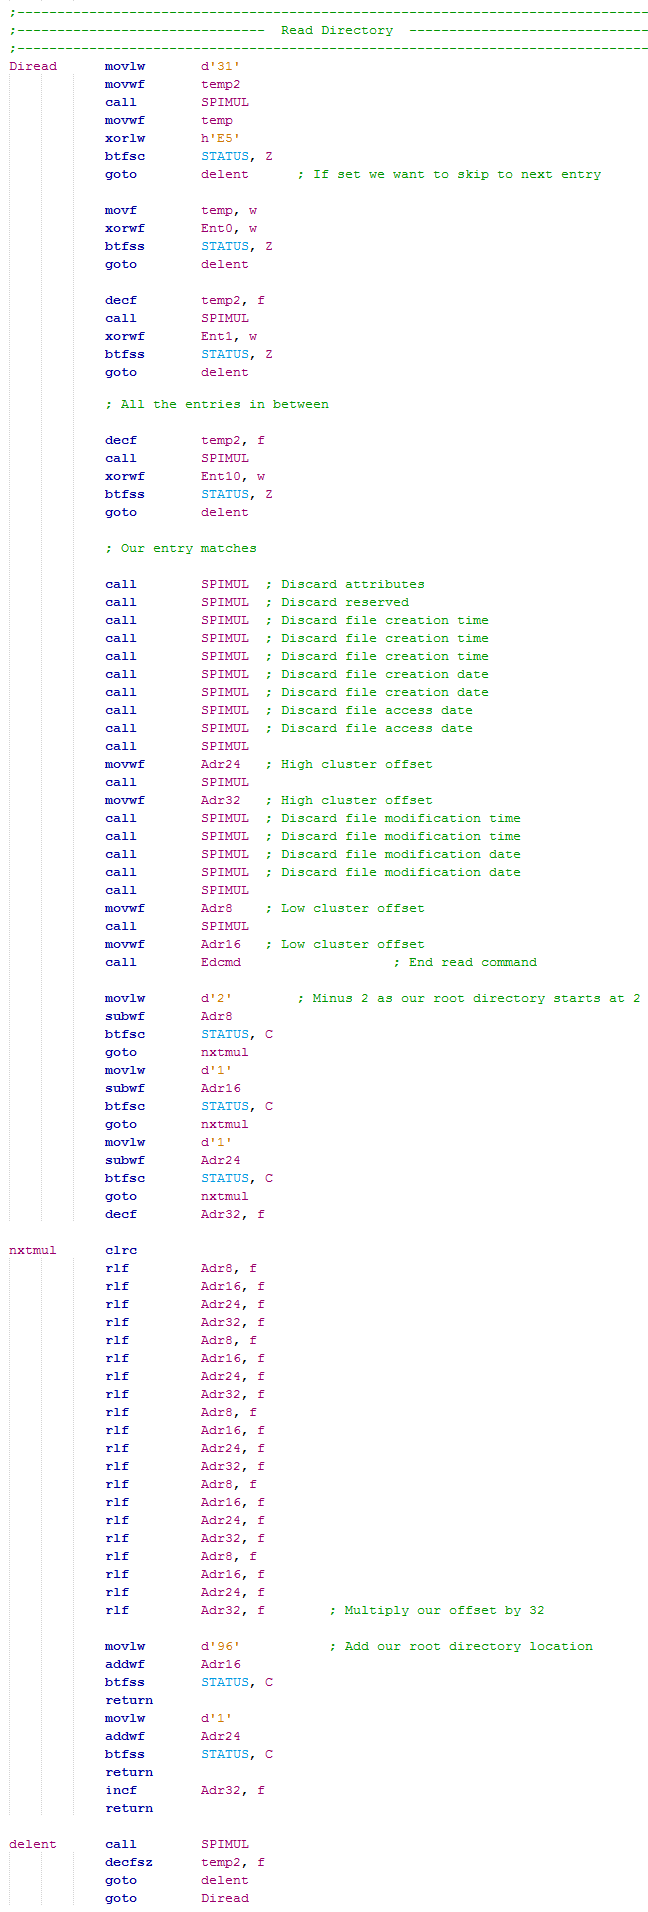
We then call up another program that matches the entries to point us to our next directory. It first starts by checking if our entry is deleted, if so then it will go to a program that jumps to the next entry by incrementing a further 31 bytes. If not deleted then it will check the first letter against the letter we specified in the previous section, if it doesn't match it will skip ahead to the next 32 byte entry. If all of the characters match we then extract the cluster offset data and place it to our address variables. Since the directory start is two we minus 2 from these address variables. We then multiply all of them by 32 as there are 32 sectors per cluster and then add our root directory location. At the end of the program we now have the location of our next directory in the addressing variables.
With our next directory in mind we load up our entry variables, call the read program to start the SD reading process and then call up the next program to find that entry. After we cycle through the entries we will have our image address, so instead we call the program to start the SD reading process and then a program which displays the image file to the OLED display.
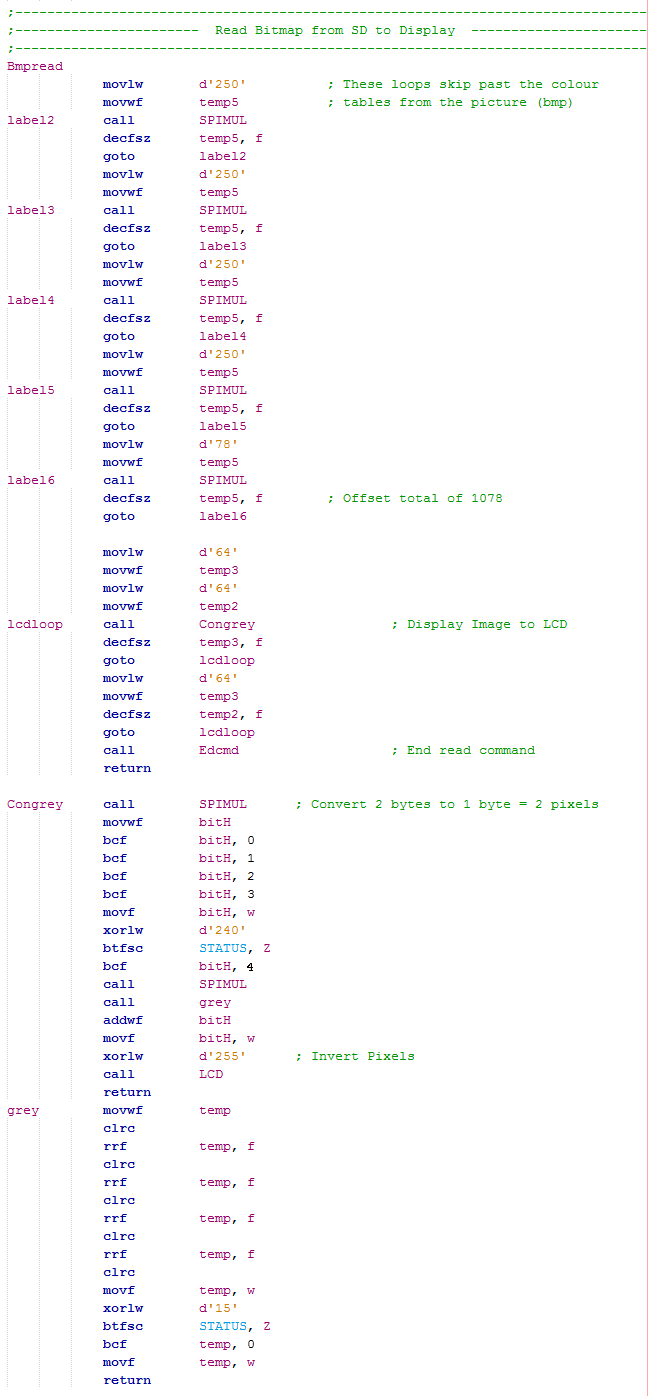
The program first starts by incrementing past all of the information data, remember in the previous chapter there was an offset in the image file telling us where the image data started, the first series of counters increments 1078 times to get past all of this data. Optionally I could increment the image file address an additional two sectors and then count an additional 54 bytes, this would save time but I didn't want to complicate this example. The next program reads the 8-bit colours and converts them to 4-bit, two four bit nibbles are joined together and then sent to the display, the program loops a total of 4096 times to complete the image.
That's it!
Here is a copy of the program - Text Version
You will of course need to change the entries to suit your needs.
Extra - Nyan Cat!
If you don't already know what Nyan Cat is it is a collaboration between Christopher Torres Poptart Cat and Hatsune Miku's Nyanyanyanyanyanyanya! Someone on the internet called Sara animated this image and added a modified version of Miku's song. So what actually is it?, it was a meme, a viral internet video that was spread around social media, why it became so popular I don't know. Since the animation only has ten images, or what I could extract, I thought it would be a simple bit of fun.
I saved some images to my SD card, displayed them on the OLED in sequence with a small delay between each and then filmed it on my camera. I then extracted the audio file from the original and merged it to my video, unfortunately when filming a display you will always get the refresh lines.
Hello, if you have enjoyed reading this project, have taken an interest in another or want me to progress one further then please consider donating or even sponsoring a small amount every month, for more information on why you may like to help me out then follow the sponsor link to the left. Otherwise you can donate any amount with the link below, thank you!