Promethean Classic Mark 3.0 and 4.0
These are the third and forth rifles that I have designed, again I changed the design.
Specifications
| Barrel Calibre | .22 (5.5mm) |
Barrel Length |
21.65inch (550mm) |
| Power | 11.5ft/lbs |
| Weight | 2.2kg |
| Overall Length | 900mm |
| Stock | Carbon Fibre |
| Airtube Capacity | 130cc |
| Shot Capacity | 90 shots at 200bar |
| Extra's | Precision machined target crown |
Build Log
The P22CMk3 is the third rifle that I have designed and hopefully it will be the final design, the valve concept has totally changed. Before a pressure sensor read the pressure inside of the airtube then the computer calculated how long to open the solenoid valve for. It required a huge surge in energy to open the valve but unfortunately stayed open for too long, a more powerful spring could have been used to close the valve but then more energy would have been required to open it. The mapping of the computer was going to take too long and I could not guarantee that after a couple of thousand shots that It would still be delivering consistent pellet velocities at the different airtube pressures. Instead I have gone for a simpler design that I think could be more efficient on air than most other rifles on the market. It uses an electronic pressure regulator and a pressure sensor to give feedback to a computer, meaning that it can regulate an exact pressure even as parts wear over time. The other thing is that the valve shuts off instantly when the required pressure is met, unlike a mechanical regulator that reaches a pressure quickly and then slowly creeps to a slightly higher pressure.
The big difference is how the valve works, on a conventional rifle a valve is opened for a short time by the strike of a hammer, a very strong spring then closes the valve. The difficult part is closing the valve fast enough, too early and the power drops, too late and air is wasted. When closing the hammer it bounces and more air is lost. On this rifle the regulator fills a chamber full of air, the main valve opens firing the pellet and remains open until the gun is re-cocked, once cocked the regulator opens again. The chamber holds the correct volume of air, if a greater power is required then more pressure is released into the chamber. Compared to the last design the transfer port has been drilled from 2.5mm to 4mm and the valve seal from 3 to 4mm. The easier the flow of air the less pressure required and therefore it will keep the power when the airtube is low.
The other extra feature that I'm going to include into the rifle is an LCD screen that will allow the user to choose the power, the number of shots from new, when the rifle needs to be serviced, and the specifications of the rifle. I'm not sure as of yet whether to include a keypad and security code in the butt of the stock, it stops someone from stealing it or the wrong person using it, but is this over the top for an air rifle? I'll see when the time gets closer.
September 30/09/2012
The P22CMk3 project has now begun.
I went in the garage today to make some parts, the first one being the filling adapter. The O-rings had far too much interference which caused them to get trapped, so I machined the grooves down from an interference of 25% down to 12%. The next part that I machined was an adapter to connect the airtube to the solenoid, I managed to use the old valve to save material, I placed a thread and an O-ring groove inside of it. The solenoid parts I made from silver steel, Its not the greatest stuff to machine but its better than mild steel. The seal for the regulator is a BS002 O-ring which is the smallest that I can get, it has an inside diameter of 1.03mm. The reason for such a small bore is because the smaller it is the easier it is for the valve to open, this is so I can keep the power required to a minimum.
I have ordered some brass bar to make the valve body, I'm hoping that I can get the whole rifle 100% complete in two weeks. A week from now I have a week off, so if the rifle is working and complete I can get myself a stock made and the parts electroplated. I do have a few ideas for rifles in the future which will be built if this design works, but I'm not giving too much away as of yet.
October 10/10/2012
Over the past four days I have been trying to get something done on this rifle but one way or another my progress has been delayed. The main valve body housing required a M17 x 1.0 thread inside of it, I had to order a threading bar which I only received today, I did manage to make a tool from an older boring bar and used that to make the thread. Then a morse taper adapter got stuck on a tool which could not be removed, so I had to pick one of them up before I could use the drill chuck. All in all a total of two days were wasted. Finally today I managed to get a little bit done, hopefully the whole of the rifles mechanicals shall be done tomorrow.
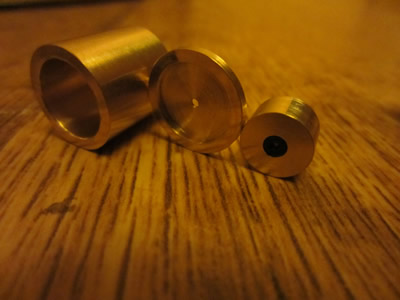
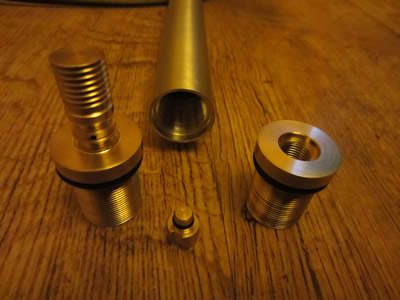
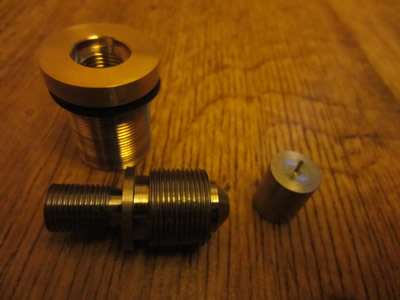
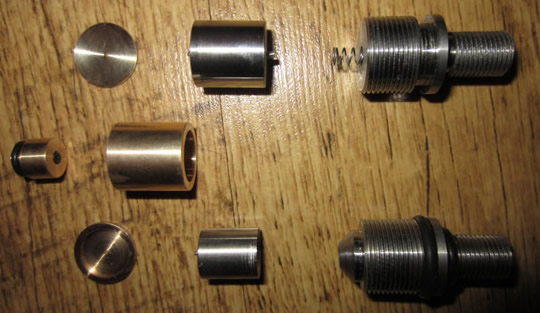
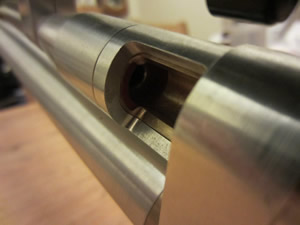
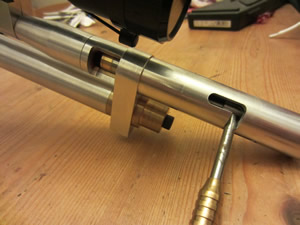
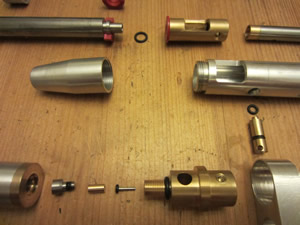
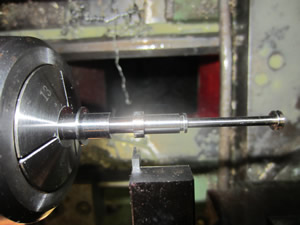
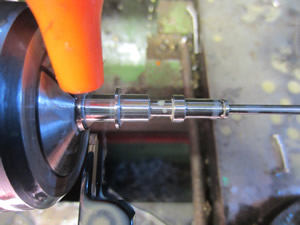
The above left picture shows the regulator assembly, the middle picture shows the main seal for the regulator, it uses a BS002 O-ring. The picture on the right shows the whole of the assembly screwed together, from the aluminium ring to the airtube is where a coil of wire will be placed to actuate the regulator. I have placed a coil on the regulator, filled the airtube to 2500psi and tested its operation. All that now needs to be done is the firing mechanism, the bolt, magazine, electronics and the stock. I would like to get the mechanicals done for about 1pm tomorrow so that I can take the aluminium parts to be anodised.
October 11/10/2012
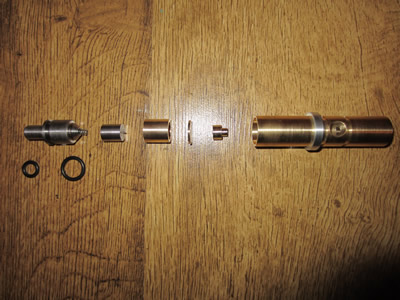
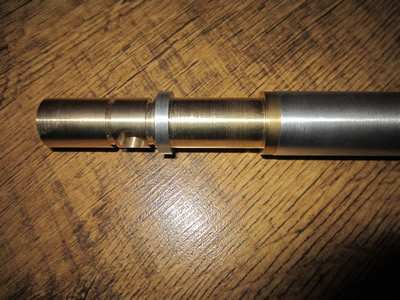
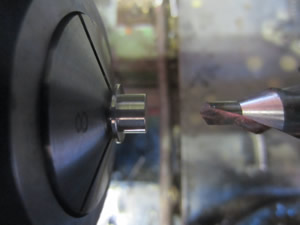
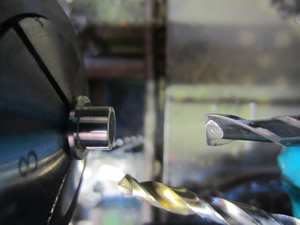
 The transfer port was the next part on my list, the new design is on the left and the old on the right. I have made the volume of air after the blue seal smaller so that less air needs to be displaced when the valve is opened. The bore in the transfer port has been increased from 2.5 to 4mm making air flow more efficient. The seals used are injection moulded meaning that the sealing faces are perfect and therefore very little risk of them leaking, they can also be replaced less frequent and quickly.
There are quite a lot of bits that I made today, infact everything except for the magazine and a couple of parts for the trigger. The great thing is that I got the rifle working, filled the airtube to 1000psi and shot a pellet through the chronograph, it worked out at 10.5ft/lb, this is where it needs to be because a heavier pellet will bring it to the 11.5ft/lb mark.
Tomorrow I think that I will get the electronics sorted out including the LCD screen, a hand grip and trigger. I highly doubt that I will have enough time left in the day to take the parts to be anodised and they will probably want the parts for maybe a couple of weeks. I have just recently got shooting permission on some land so I will take it there and test it out first. The rifle probably won't have a stock by then but it should still be usable, its over the legal length requirement due to the length of the barrel so I'm ok.
October 12/10/2012
Last night I decided to do a little bit of the electronics side. I ordered a programmable chip, downloaded some software and ordered a couple of extras. It must be about 4 years since I last did any programming and that was on my GCSE project. I remembered most of it and spent about 3 hours writing the coding for the rifle, although its still not finished. One problem that I thought I might have is the pressure sensor being analogue, now chips usually read analogue up to 8 bit which means that it would split the pressure range of the sensor into 255 increments, the sensor reads in the range of up to 250bar, so approximately one increment per bar. The chips I have just ordered can operate up to 10bit which means 1023 increments and therefore 1 increment is 0.25bar, the higher the accuracy of the pressure regulation the more consistent the shots are, variations in shot velocity will down to the pellet.
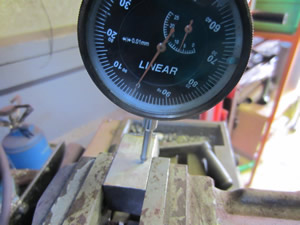
I machined a few more parts for the trigger so it is now fully operational, I just need to incorporate it into a hand grip. Meanwhile I did some more test shots at 1100psi, the pressure is an approximation because the gauge isn't accurate and the increments are 100psi. I was quite surprised with the consistency; 542fps, 538.1fps, 543.5fps, 539.9fps, 543.1fps. An average of 541.6fps (10.4ft/lb) and a standard deviation of 2.2fps. Everything is just about what it needs to be, the pressure doesn't even need to be that accurate.
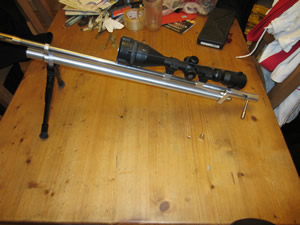
I have ordered some metal to make a barrel mount for the scope, I could have bought some but they look cheap and low quality. I have bought a bipod to stabilise the rifle as much as possible, afterall it is intended for target shooting. I was originally going to make the stock from foam and then wrap it in carbon fibre, I once attempted this and it didn't end well. I have thought better of it and bought a wooden stock, I shall adjust it to what I need it, make a mould and then have a go at making a synthetic stock. The rifle was originally going to be multiple shot but I never worked out a design to index the magazine, so instead it is going to be single shot. It is intended for accuracy so only one shot should be needed for hunting, and for target shooting speed of reloading is not an issue.
October 13/10/2012
I received my electronic parts today, day was messed up again so little was done.
October 14/10/2012
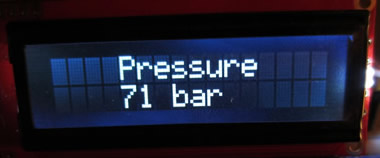 This morning I created a program for the LCD screen to display the pressure from the pressure sensor. The sensor gives an output of 1 to 6V, therefore at zero pressure there will be an output voltage of 1V, at 50bar there will be a voltage of 2V and so on. So in the program it takes off 50bar to compensate. I ran off about 40 shots between 69 and 79bar, mainly around the 70bar mark. It took about 28 shots to run the barrel in, the last 12 shots were very consistent. (only the last 25 shots were recorded).
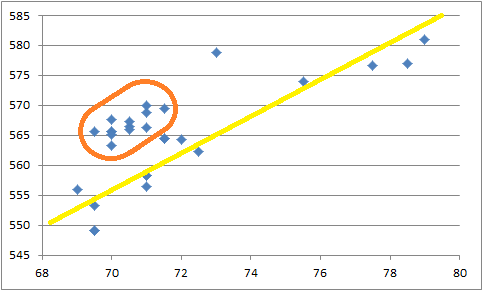
This graph of the left represents pressure vs velocity. The yellow line shows how linear the the increase in velocity is with the increase in pressure. The orange circled area shows how consistent the last 12 shots were, with there being a maximum difference of 5fps. I would say that I'm very pleased with the shot consistency, and its certainly up there with the top competitors.
I have had a couple of issues with the regulator, I thought that a rod of 1mm would have been small enough to make opening it easy and flow to be low, but I keep having a few issues with it. I made another part for it this morning which has sorted one of the issues out but the flow is still too high. When operating at high pressure the flow is reasonably low because the pressure closes the seal down, but at low pressure the flow is extremely high.
I'm currently using a BS002 O-ring that has an OD of 3.6mm and an ID of 1.07 fitting into a bore of 3.2mm, squashing it down 0.4mm, making the bore around 0.7mm. A BS001 O-ring has an OD of 2.78 and an ID of 0.74mm. If I was to use a bore of 2.5mm then it would probably make the ID of around 0.5mm. Meaning that I could half the flow and half the power required to open it. The rod would be changed for 1mm down to 0.75mm.
October 16/10/2012
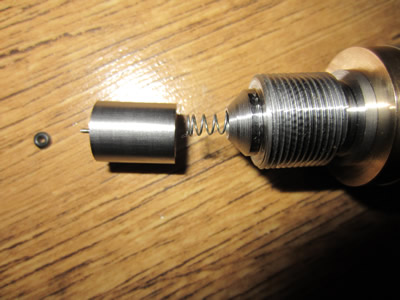
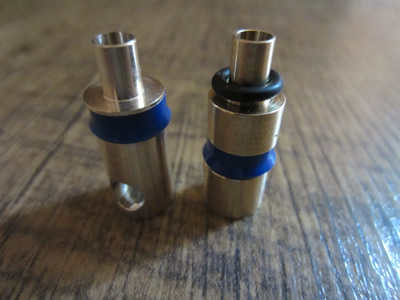
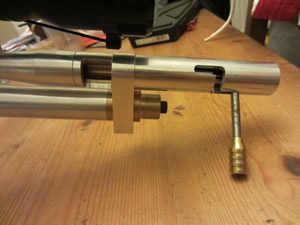
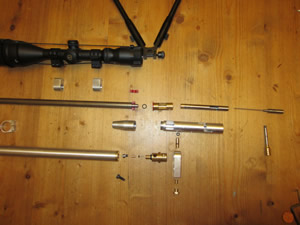
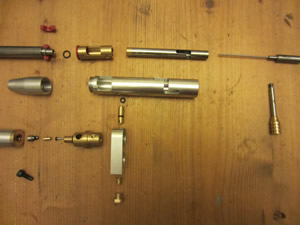
 I went back to work yesterday, since then and all of today I have been thinking of how to remake the regulator. I didn't want to use a smaller O-ring because it would make manufacturing more difficult, I didn't have the tools required either. So instead I have decided to make the solenoid more efficient which is what I should have done the first time. I have made the moving part inside of the regulator larger so there is more for the electromagnet to react with, I also machined the faces flat. The problem was not opening the valve, it was keeping it open, now I machined the faces at 45degress to slightly increase surface area and therefore holding power, but I don't think the angles were perfect. I just guessed the coil and found some wire that was laying around, I shall be rewinding this coil with something more suitable. The flow problem will be sorted out with a restricting washer, I will drill it with a hole of 0.5mm and see what happens from there. (In the picture, top parts are new, bottom are old)
Tomorrow I need to take the parts to be chromed and see if I can get them done before the weekend. I would like to get the rifle fully functioning for the weekend so I can take it out to test the accuracy, although I doubt that it will include the stock.
October 22/10/2012
I thought that I would test out the regulator before getting the parts chrome plated, unfortunately it did not work as I had intended, the valve was not holding open unless a large amount of power was used. I have been looking into commercial valves and they are far too expensive and bulky. A new solution needs to be found, I came across a valve that was servo actuated while trawling the internet, so I think I will give this idea a shot. The servo will actuate a needle valve, a servo has incremental rotational movement meaning that I can control how far to open the valve. The valve will be fully open to fill the secondary reservoir, when the pressure approaches the required value the valve starts to close. Using servos will save power compared to the very energy thirsty solenoid that I created, I can also use them to cock the rifle and operate the trigger system. As long as I keep the power below 12ft/lb and keep it bolt-action then I will cease to require a firearms license.
Apart from all of this I have done very little on its construction, researching valves took the most time. I received a stock, a bipod and some metal to make the scope mounts. The stock is of very good quality so I'm a bit reluctant to start chopping it up, this will be the last part of the rifles construction. I'm going to get the scope mounts machined in my work dinner, buy some small servo's and by the weekend I should have a functioning regulator.
November 12/11/2012
Just a quick update. I got the scope mounts completed, they look great and function perfectly. The pressure regulator has been on my list for ages now but I don't seem to be able to get the time to finish it. I have had a couple of design ideas with this but still unsure of what to do. The servo that I have bought is huge, placing it underneath the airtube takes up a considerable amount of space, I had also thought of using a hydraulic line from the regulator leading to a servo inside of the stock, this would save a large amount of space but would complicate things greatly.
April 27/04/2013
A long time has passed and the conclusion of this rifle is that its construction has ended. The P22CMk4 has begun design and construction.
October 27/10/2013
Back in April I finished the design of the P22Mk3 and started the Mk4, it took me about two weeks using about 3 hours after work everyday of machining time. I wanted to go for a much more simple design but for some reason this never happened, although it was more compact and better built, even using bronze bushes for the bolt. Below shows how far I got;
The only few things left to do was the trigger and pressure regulator, my problem was that I was never happy with the regulator design as it was the part that would have the most wear, I couldn't have this part fail premature, so I'm in two minds whether to build a completely new design again.
I have gone through so many ideas, even to the thought of a built in electric pump, although it would be still too bulky and a bit noisy. One idea was a cartridge system, although these are strictly illegal, but I think my design may avoid the illegalities. The law states that a "Self-Contained Cartridge System" cannot be used, this is basically a pre-charged cartridge with a pellet stuck in the end. If the pellet can only be inserted into the barrel and not into the cartridge then does this count as a self contained cartridge system, I think not. The rifle would only be single shot intended for target shooting, although hunting would still be a viable choice. The hole in the cartridge would simply be too small to house the pellet and any other commercial pellet size. There would be a station that you fill the cartridges which would be regulated, so each shot would be consistent and be in the legal power limit. The benefit to this whole system is that it can be compact and the rifle may only weight about 3lb.
P22Mk5 - Build Log
I was not going to show all of the construction of the rifle, just a few components.
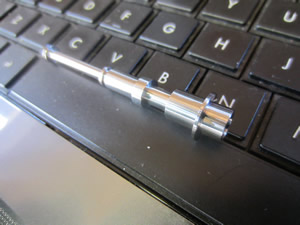
One of these parts is the valve stem. This is the third attempt of this part, it is mainly due to the fact that it is very thin and long. I'm not going to explain the steps, but everything had to be machined in sections, the long stem part had to be cut down with a grooving tip as its so long that it cannot be machined longitudinally.
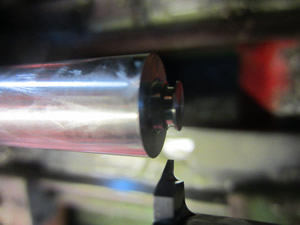
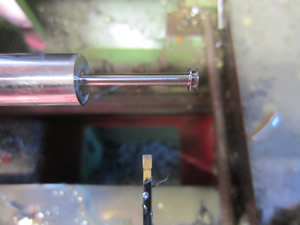
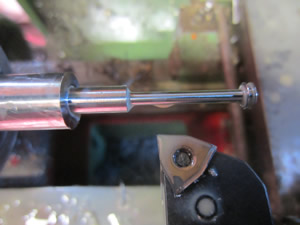
It was parted off, turned around, faced and drilled. The tolerances on this part were really tight, ±0.02 on almost all of the dimensions, it is also made from 316 stainless.
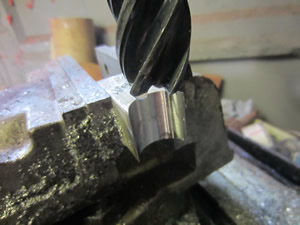
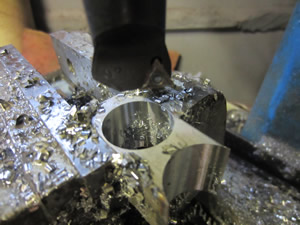
Another part I machined is the stainless part that connects the barrel to the rest of the rifle, it was a real struggle as my milling machine really is not sturdy enough for materials this hard. There is yet further machining on this part.

The last part of the construction is the airtube. It will be running at a pressure of 200 bar (2900 psi) and its construction will be made from 316 stainless which is less prone to stress fatigue and corrosion than if it was to be the original aluminium. The major issue with it is the thickness of the walls (2 mm), which is far too thin to be machining a thread, the threads will promote cracking and of course will only make the wall around 1 mm. The option that I have gone for is to double TIG weld the end caps, the whole thing then will be hydrostatically tested by myself to a pressure of 400 bar, regulations would only require 300 bar. I will test every single rifle as welding is not a consistent process, one tube may be weaker than another due to the heat involved.

To the left just illustrates my idea of double welding the airtube. There will be two threaded discs present inside of the airtube, one welded first and then the other. The purpose of doing this is so that I can spread the load over two welds, the other is that I don't want to use a filler rod when welding. The welds will only be shallow, but more consistent than if I was to use a filler, one weld would probably be strong enough.
I thought that I would get the rifle completed, I guess not, it was actually a good design that I may have to revisit some time. The only problem I thought of was that the barrel split from the breech by rotation, the problem was that the rifle would have to removed from the shoulder to reload. Some of the parts were also quite intricate and without a cnc lathe were very time consuming to make.
Hello, if you have enjoyed reading this project, have taken an interest in another or want me to progress one further then please consider donating or even sponsoring a small amount every month, for more information on why you may like to help me out then follow the sponsor link to the left. Otherwise you can donate any amount with the link below, thank you!