18 Series - Chapter 11 - Asynchronous Serial EUSART
A fading technology is the asynchronous serial, aka EUSART (Enhanced Universal Serial Asynchronous Receive Transmit). Serial is sending data via one line, so for example I could send 8 bits of data via 8 data lines like for the character LCD whereas serial can send 8 bits of data down one data line. Serial has to run at 8 times the speed compared to parallel but it does save on eight times the space. The unusual thing about asynchronous serial is that it does not have a clock line, instead it relies on that the data is transmitted at an exact frequency and that the receiver also runs at an exact frequency.
Baud Rate
The rate at which serial is transmitted is known as the baud rate, so for asynchronous the transmitter must have exactly the same baud rate as the receiver otherwise data will be lost. The most common baud rate is 9600 which is used for RS232 between computers and machinery, an older CNC control for example.
The baud rate is a measure of how many bits are transmitted per second, so a 9600 baud would be 9600 bits per second. Since serial does not have a clock line it needs some way saying when there is a start to a byte and an end, it concludes that a data string consists of 10 bits - a start bit, the 8-bit data and then an end bit.
The below screen shot is an example of two bytes of data being sent at a baud rate of 9600, of course this oscilloscope trace will make little sense for now.

EUSART Data String
Firstly lets say we are running at a baud rate of 1000, this means that each bit is 1ms long and that a data string of 10-bits is 10ms. The data line will begin high, when it drops low this indicates that a start has begun, the first 1ms is read as the start bit. For the next 8ms are the data bits, high for 1 and low for 0. The tenth millisecond is the end bit and this should be high, if not then the microcontroller will see an error. The diagram below is an example of 00010111b sent via serial at a baud of 1000.
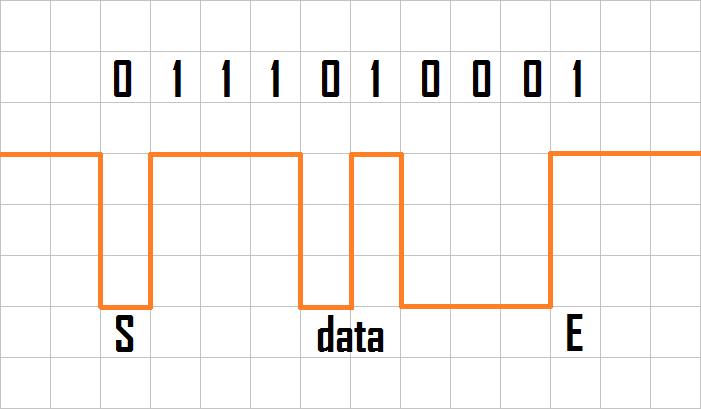
Each square represent 1ms.
It should be noted that the lowest bit is always sent first.
Taking a closer look in the first example you can see that the data was 10101000b and 00110000b, which translates to 00010101b and 00001100b, this can be seen below.
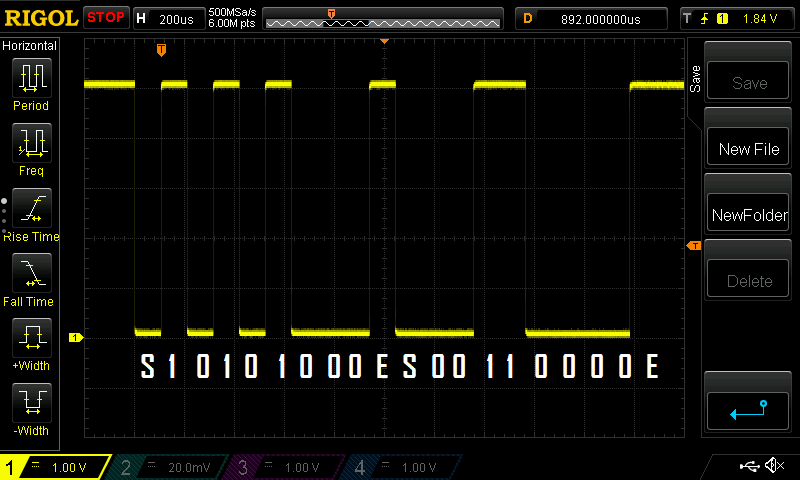
Remember the lowest bit is always sent first.
Registers
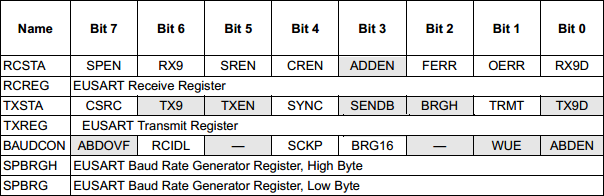
There are quite a few registers associated with the EUSART module as shown in the table below, there are some I've omitted such as those concerning interrupts.
Baud Control
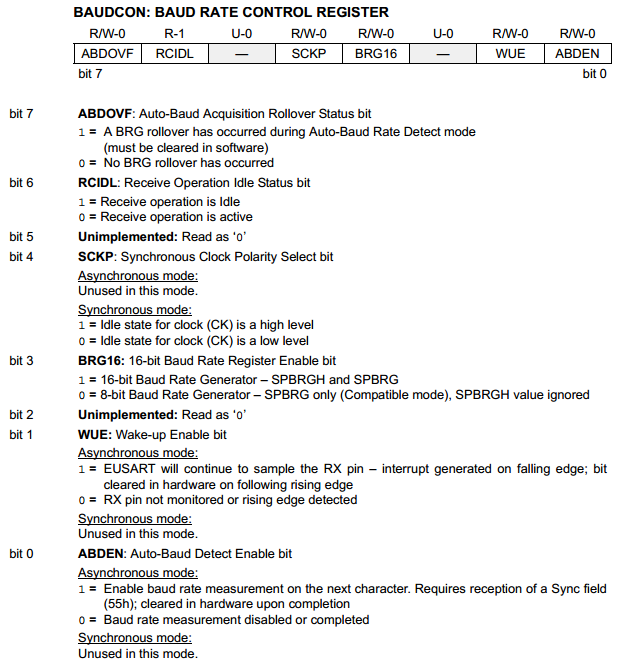
The first to discuss are the baud control registers as generally these are set once and forgotten about. The first register is the BAUDCON in which the BRG16 bit (bit-3) is the only one that really concerns us for asynchronous, there is an auto baud detect function but I will not discuss that further.
To know whether the above BRG16 bit needs to be set all depends on the baud rate which can be calculated via the following equations. The "n" value is what is to be placed in the two baud rate control registers SPBRG and SPBRGH. It can sometimes be quite difficult to pick an equation but I would always go for the bottom one and set the BRG16 and the BRGH bit (which is in the TXSTA register)
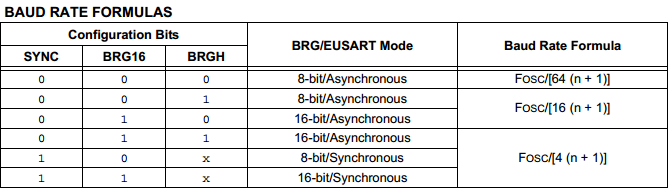
So for example I want a baud rate of 9600 and my oscillator frequency is 32MHz.
So
( 32M / (9600*4) ) - 1 = n
n = 832
TXSTA
The TXSTA register is a control register used to setup the EUSART module, it is transmit biased.
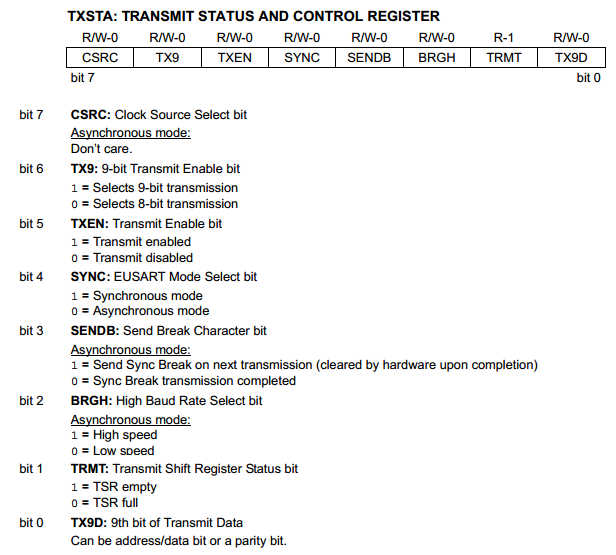
CSRC - Ignore CSRC as this is only used for synchronous.
TX9 - 9-bit transmission is used when an extra bit is needed to indicate whether data or an address is being sent, choose 8-bit mode.
TXEN - This enables the transmit module, best to just leave this enabled.
SYNC - Sets whether we want synchronous or asynchronous mode, of course we want asynchronous.
SENDB - This is not something I would use for my projects but it is used a great deal in the RS232 protocol, it is basically a 12-bit string of useless data, it's purpose is commonly a delay.
BRGH - As mentioned earlier this is a function when setting the baud rate.
TRMT - This bit is to tell us when a transmission has been completed, it is very important.
TX9D - This is our possible 9th bit to send if in 9-bit transmission mode.
RCSTA
The RCSTA register is again another control register used to setup the EUSART module, it is receive biased.
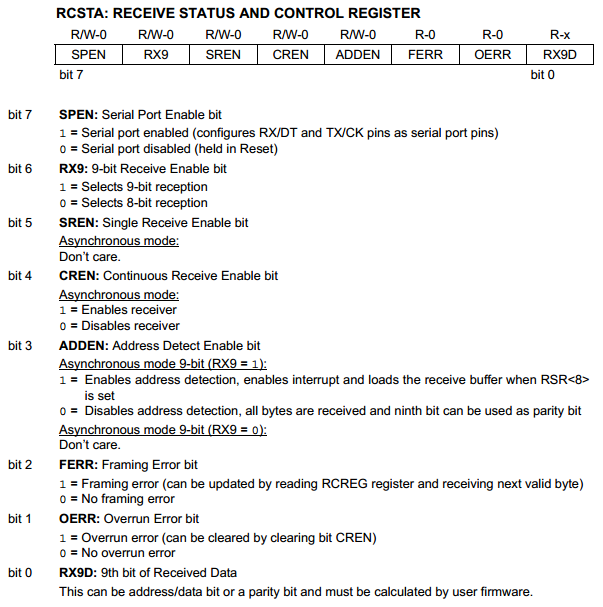
SPEN - This enables the serial port function.
RX9 - Allows us to receive a 9th bit if this is set.
SREN - Only used for synchronous mode.
CREN - This enables the receive mode.
ADDEN - This is to allow a particular interrupt condition if the 9th bit is a 1 indicating an address, since I would not set RX9 in the first instance this bit can be forgotten.
FERR - This bit will flag if there is an error with timing, the baud rates do not match.
OERR - If too many bits are received then this bit will flag.
RX9D - This is our 9th bit of received data, only if RX9 is enabled.
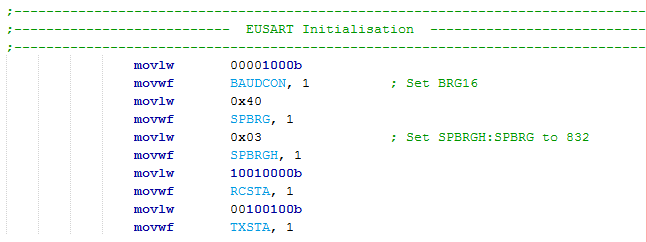
Initialisation
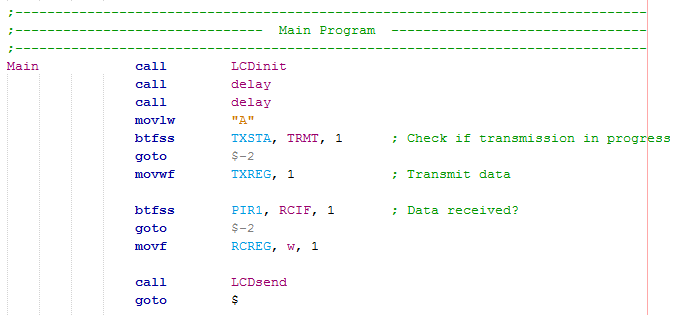
The initialisation process is a very simple one, all we have to do is follow the steps on this page. Below is the small section of program which turns on the EUSART module, transmit and receive. It also sets our required baud rate of 9600.
Transmit
This is one of the more simpler programs, as soon as data is placed into the TXREG it is transmitted. It must be noted that the TRMT bit has to be checked to make sure that a transmission is still not in progress, remember that 10 bits at 9600 baud will take around 1ms.

Receive
The receive is again quite a simple program, the odd thing is that there is no flag in the RCSTA register stating whether data has been received, the only way to check this is via the interrupt register. Interrupts will be discussed in the next chapter, this particular bit will flag but no interrupt will happen since they are disabled.

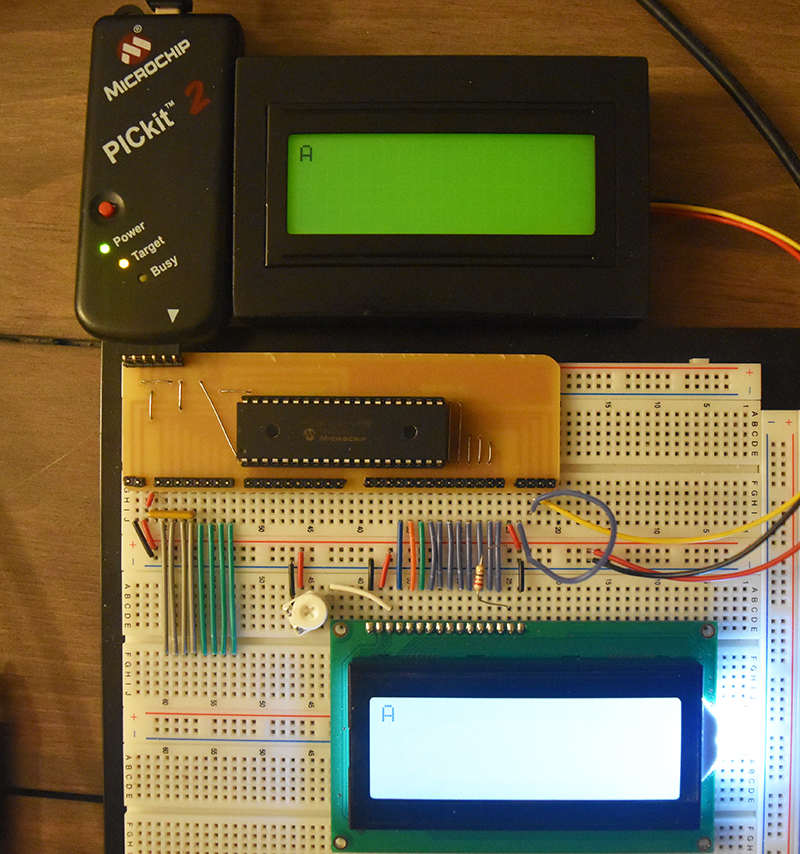
Checking if it Works
It can be frustrating if you can't get the serial function to work and you don't know whether it's your program or the device your interfacing with. I for one have created a serial LCD that allows me to send data to ensure my program is working correctly. Another way is to send data from the microcontroller to itself since the transmit and receive are actually two separate modules, the following program is an example.
Note: Place a jumper between RX and TX on the chip.
The Serial LCD
A project I would really recommend building is the serial LCD which I have covered under the 16 series of microcontroller. The EUSART module is pretty limited in what it can do but it's great for LCD's, keypad's and applications that generally don't require speed. Here is an example of the one I use, it also allows me to select between a few common baud rates.
The use of asynchronous serial will certainly have it's places in many projects but likewise it is an old technology beginning to fade. The next project will discuss the interrupt.
Hello, if you have enjoyed reading this project, have taken an interest in another or want me to progress one further then please consider donating or even sponsoring a small amount every month, for more information on why you may like to help me out then follow the sponsor link to the left. Otherwise you can donate any amount with the link below, thank you!