Microcontroller 4 - Assembly Commands
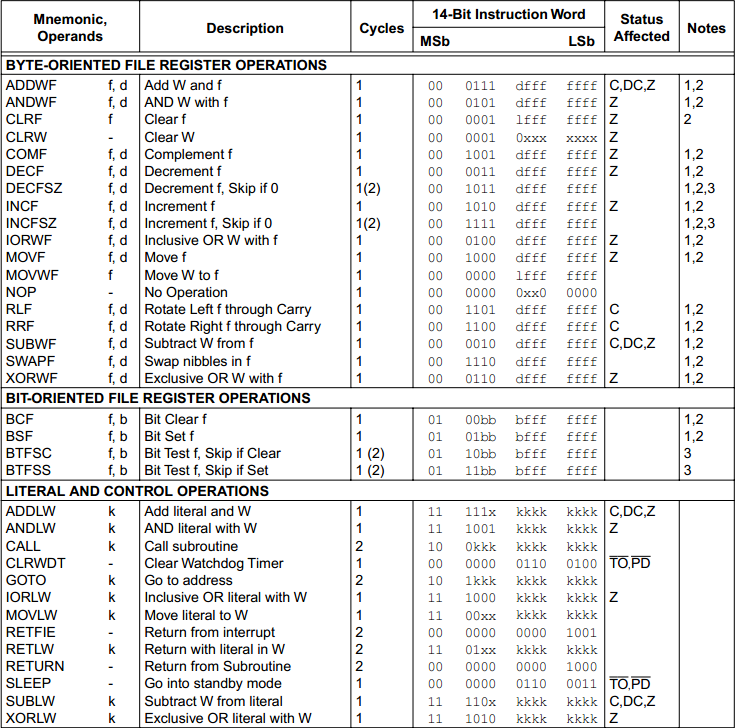
There are a total of 35 instructions to learn so it's not all that hard, a great place to start is with this datasheet as it shows every instruction, what registers it affects and how to implement them into your program - PDF
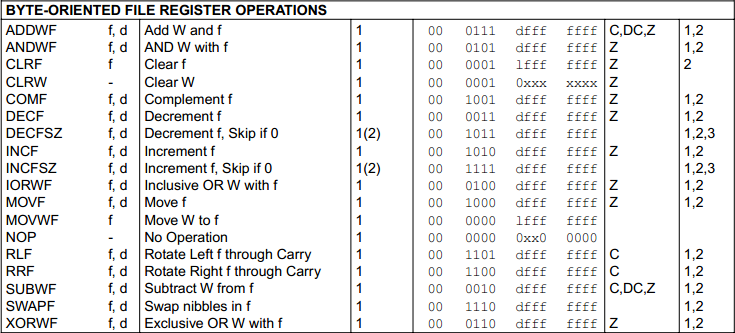
For your convenience I have copied the command page from the datasheet.
Hopefully you get the idea of how a microchip works, it moves data around. There are two main registers you will use, the working register and the file registers. The working register is where your current data is held so it can be manipulated. The file registers are anything from variables in the RAM to the Port registers. Another very important register is the "STATUS" register and as you will find out it is used quite frequently, infact it is used almost straight away when selecting the mapping banks. Below is an extract from the datasheet of the status register.
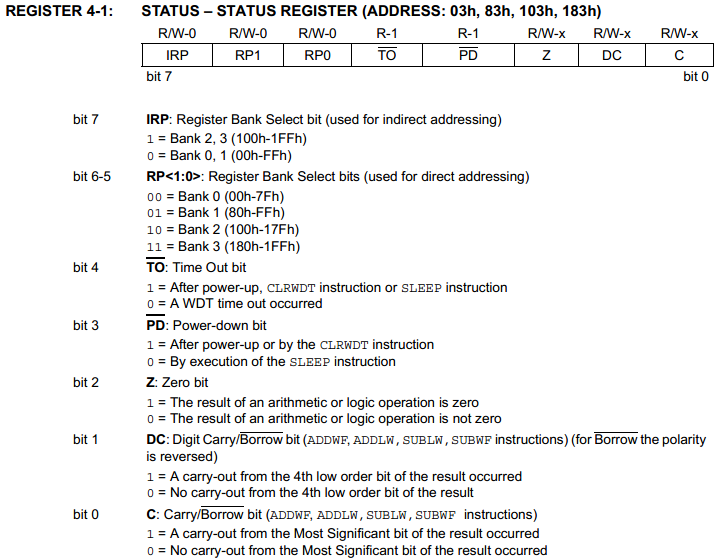
You already know what "RP0" and "RP1" do, they select the mapping registers.
You don't really need to know "IRP", "TO" and "PD".
The first three bits of the status register are the most important, two of them are quite commonly used.
C - The carry bit - This is mostly used in arithmetic operations where if the product of two numbers is more than 8-bit then the carry bit will become logic 1, this carry bit can then be stored in another variable / register. If a number greater than 255 is produced the carry will flag.
DC - Digital carry - Where the carry bit is the result from an 8-bit number the digital carry is only 4-bit. So for example if a number greater than 15 is produced then the digital carry bit will flag. It will be very rare you will ever need the digital carry.
Z - Zero bit - This bit will flag if the result of an operation is zero, this is masively important for detecting when a condition is met on a port. This will be explained in greater detail later in this page.
I will first start with the bit-orientated instructions as these are most commonly used.

One thing to notice on the datasheet is how it says, "bsf f, b", the "bsf" is your instruction, the "f" is the register you want to select and the "b" is the bit you want to deal with. For example, say if you want to set only the pin of RA5 to logic 1, using the "BSF" command can do this.
![]()
You state the command, then the file register you want the affect and then the bit of that register. Another example of this was selecting the mapping banks as shown in the following example. The bit "RP0" is set to logic 1 and the bit "RP1" is set to logic zero. Some bits can be written as symbols as the software recognises them, otherwise it would be "5" instead of "RP0" and "6" instead of "RP1".
![]()
The bit test commands are next, these are normally used for inputs but again can be used for a variety of functions. So say for example I have an input, RA1, the following program will check to see when there is an input. If the condition is not met then it will go to the next instruction, if the condition is met then it will skip the next instruction.

Now say for example I have added two numbers together and the result is larger than 8-bit, the data has overflowed and the "C" bit will have flagged in the status register. In the program below it will test if the C register has flagged or not, if not it will skip the next instruction, if it has then it will go to the next instruction. Programs are normally written like this so it can continue if no overflow has occured, but if one has then it can jump elsewhere in the program to deal with it, so the next instruction could be a "goto" command, which tells it to go to a label elsewhere that you've specified.

The literal and control operations next. "k" is a literal, this can either mean it's a label, a data constant or a register.
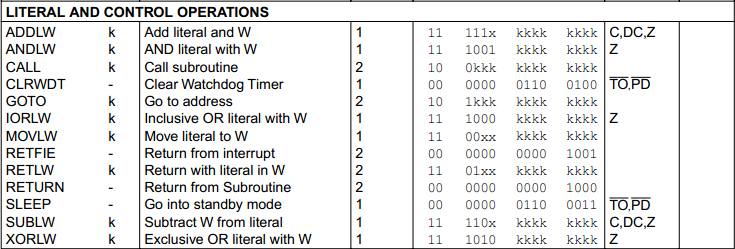
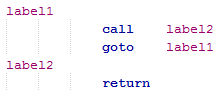
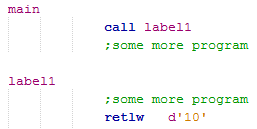
The control flow commands are the most commonly used as these can direct where a program wants to go. The literal labels are in purple, a "goto" command will tell the program to go this label, simple as that. A "call" command will call a subroutine, so it will tell it to go to a label, at the end of the program passage will be a "return", the program will return to where it was called from. This is very useful for delays, a standard delay could be written in a separate label, the "call " command could then be used to implement this delay instead of writing out multiple delays when they occur saving program memory.
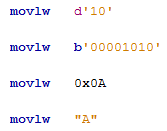
"movlw" is used to load the working register with a number, say 10, the following example shows how to do so in various formatts. The first command loads the working register with the decimal number "10", the second with the binary number "10" and the third with the hex number "10". The fourth command loads the working register with the ASCII letter "A", this is infact the decimal number "65". ASCII (American Standard Code for Information Interchange) is a numerical expression of a character, it is what our keyboards work with or how data is sent to such things like character LCD's. "movlw" can only be used to load the working register with a literal number, if a file register is used then it will load the working file with that file registers address and not it's contents.
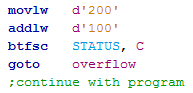
The next program loads the working register with decimal "200", the second command adds decimal "100" to the working register, the third command checks if the data has overflowed, it has so will goto the label "overflow", if it had not overflowed it would skip as "C" would not be set and continue with the program.
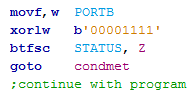
Another important instruction is the "xorlw" command as shown in the next example. PortB has been set as an input, this binary input value is put into the working register, the binary value "00001111" exculsive or's with the value in the working register, if two values match, a bit from the input and a bit in the xorlw command then the result is zero, if all of the values match then the resultant register is zero, the "Z" status register will flag. If the values don't all match then there will be a resultant register value and therefore the status "Z" register will be zero. Note that "movlw" cannot be used to move a file register into the working register, "movf" has to be used.
The last command to discuss in this subsection is the "retlw" instruction. So for example you call up a subroutine and at the end of that subroutine you need to load the working register with a value then this command will load the register with this value and then return, it saves writing out two instructions and also saves program time. It is very useful with something called a "lookup table", this will be explained at a later date.
The byte file register operations are also quite easy to deal with. Note that "d" means whether the resulting value is saved in the working register or the file register, a 0 or a 1, normally left blank it will stay in the working register. The other option is to use "f" or "w" as the software recognises this too and it has more meaning to the user.
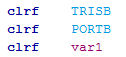
Using the "bcf" can only deal with one bit out of a register whereas the "clrf" instruction will clear a whole register. For example the first instruction below will set all of PortB as an output, the second will make all of PortB logic 0 and the third would clear the pre-set variable "var1". The "clrw" command can be used to clear the working register instead.
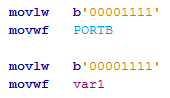
A very commonly used command is the "movwf" instruction which moves the contents of the working register to a file register. The first example loads the working register with binary 00001111 and then moves it to PortB, this would turn bits 0-3 to logic 1. The second example is to send this value to a variable.
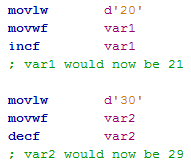
The next instructions are the "incf" and "decf" commands, increment file register and decrement file register. The first example loads the working register with decimal "20", loads it to variable "var1" and then increments this value to "21". The second example does the same except it decrements the value in variable "var2".
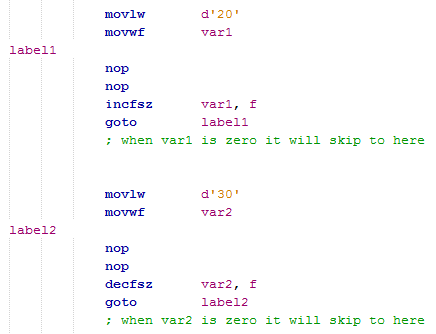
The next instructions are the "incfsz" and the "decfsz", increment file register skip if zero and decrement file register skip if zero. These instructions are particulary helpful when creating delays, so in the example 2 it loads the variable "var2" with the value "30", the program skips through some "no operation" commands that waste time, the "decfsz" command decrements the variable "var2", the program jumps back to label 2 to start the process again, eventually the variable becomes zero and then skips the next instruction, the goto instruction. This is the only way of creating a time delay, the longer the delay the more times it needs to loop. The increment command is very little used for delays, very little used at all. Note that the lower case "f" means to leave the value in the file register.
I think that covers most of the commands and gives you an idea of how to interpret them from the datasheet. The rest of the commands are not used as often but are certainly not dormant, I'm sure I will cover all of these commands in projects to come.
Hello, if you have enjoyed reading this project, have taken an interest in another or want me to progress one further then please consider donating or even sponsoring a small amount every month, for more information on why you may like to help me out then follow the sponsor link to the left. Otherwise you can donate any amount with the link below, thank you!