OLED and SD Card - Page 3
Now we know how the OLED display works along with the SD card but we need to send an image from the SD to the OLED. There are many different types of images but what we need is the simplest to understand, one that doesn't have any compression. The bitmap is by far the easiest image file to deal with, I will work on decoding images such as JPG's in the future.
Firstly we need to find an image, the theme being cats.

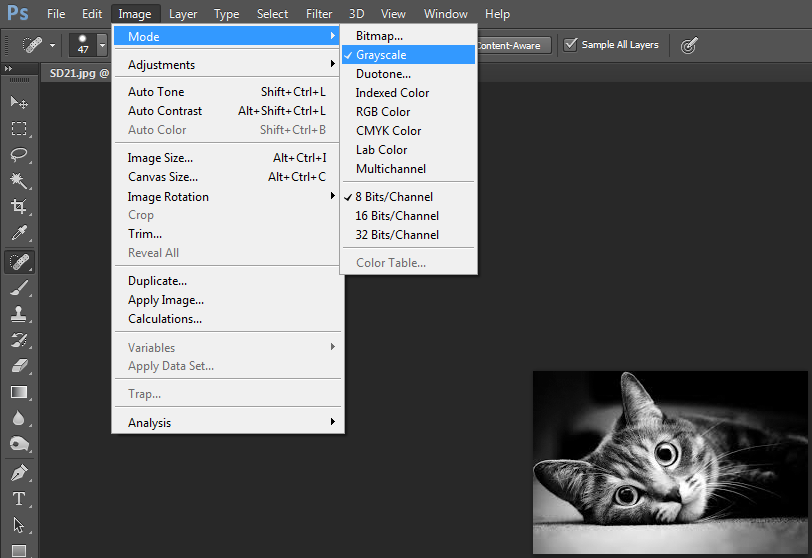
The first thing is to set the picture into grayscale - black and white. We also need to ensure that we are running at 8 bits per channel, this is 8-bits per pixel and therefore a maximum of 256 different colours. We of course only want 4-bit but that is not an option.
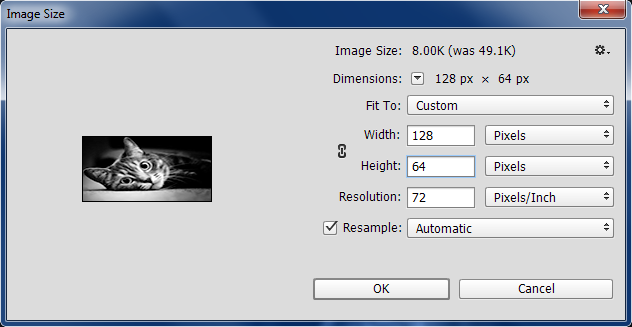
The image must be must be reduced to 128 x 64 pixels as this is the size of our display.
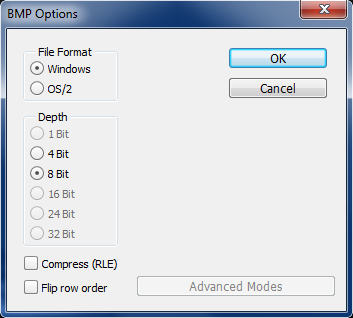
The image must then be saved as a bitmap (.bmp), a second option will arise, we want to set the colour depth as 8-bit. Even though there is an option for 4-bit it doesn't seem to generate the image properly, for my software anyway.
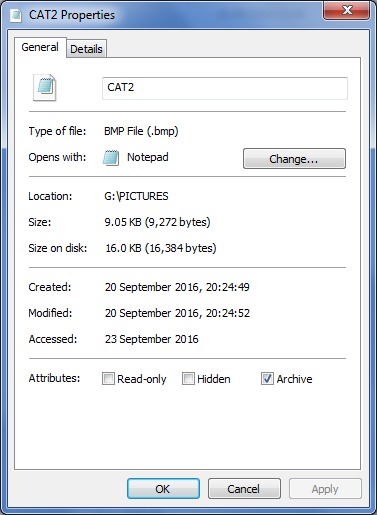
Clicking on the properties of the image you can see how much memory it has taken. Just over 9k for the picture file, 8k of that is the image and the other 1k are information details about the image. One thing to note is the amount of memory it has taken on my SD card, 16k byte. It will be discussed later why this is so but it is all how the data is allocated.
Here the standard format of a bitmap file, this is the part that added over 1k to our image file, mainly due to the colour table.
| BMP File Format | |||
|---|---|---|---|
Name |
Size (Bytes) |
Description |
|
| Header | 14 | ||
| Signature | 2 | "BM" | |
| File Size | 4 | ||
| Reserved | 4 | ||
| Data Offset | 4 | Offset to our Image data | |
| Info Header | 40 | ||
| Size | 4 | Info header size - 40 byte | |
| Width | 4 | Pixel width | |
| Height | 4 | Pixel height | |
| Planes | 2 | one | |
| Bit Count | 2 | Bits per pixel | |
| Compression | 4 | Type of Compression | |
| Image Size | 4 | Compressed image size | |
| X pixels per m | 4 | ||
| Y pixels per m | 4 | ||
| Colours Used | 4 | ||
| Important Colours | 4 | ||
| Colour Table | 4 * number of colours | Not present if bits / pixel less than 8 | |
| Red | 1 | ||
| Green | 1 | ||
| Blue | 1 | ||
| Reserved | 1 | ||
| Repeated again * number of colours | |||
| Image Data | Depends on image Size | ||
The next program you should download is something called "HxD" which is hex editor, it allows you to open any file and view it's hex contents. The major problem with deleting important files on a computer is that you only mark their location as "deleted", that means when read the file path remains, it reads the part of code that says it's delete and ignores the file while in fact the file still remains. Anyone can find the contents on a hard drive with this software and extract the file that is listed as deleted, this is why you should destroy a hard drive before scrapping it. There is dedicated software that can extract all the data from a hard drive in very little time. One benefit is that you can recover a file you mistakenly deleted if you have the time to search for it.
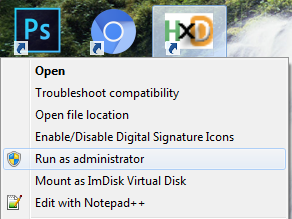
Downloading the software will only take a short amount of time due to it being a simple program, since we are reading / modifying drives we must run the software as an administrator. Just right click on the software icon and choose "Run as administrator" option. There are plenty of other software's out there, "WinHex" is another popular choice as it will decode the storage device and show you every file on it even if deleted, it does however crash on my computer.
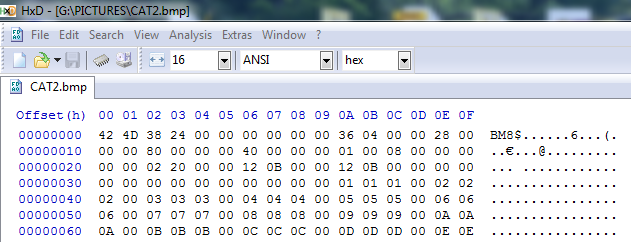
The next step is to open our image file, remember the first 54 bytes is the information about our image, the 1024 bytes after that is the colour table and then the image itself. A hex editor will only convert certain characters to data we can read, this is because this is the only data that a computer will recognise as anything other than just data. It is only upper case characters, numbers and some special characters. Another thing you should be aware of is that the data is written least significant byte first, therefore our image size is 00002438 (the bytes 2 to 5), translating to decimal means our image is 9272 bytes in length. Bytes 0A to 0D are also very useful as this is the offset to the picture from the very beginning of the file, 0436 hex equates to 1078 decimal, 54 bytes for the information header and 1024 bytes for the colour table. There are then 8192 bytes for the image, some reason there are two additional bytes after the image, I assume to make it up to a multiple of eight. There is one final point and that is our image is stored backwards.
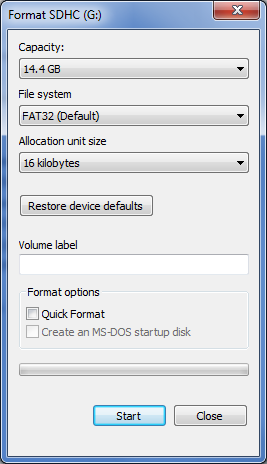
Now we know what to look for in regards to the image we now need to know how it's file is stored on our SD card. We can write anywhere to our SD card but ideally we need some kind of a structure, this is in the form of FAT32 or NTFS. The NTFS structure is generally used in USB sticks otherwise everything else uses the FAT file structure. The main two structures used are FAT32 and exFAT, the first being 32-bit and the latter being 64 bit. The first thing to do is format our SD card, do not select quick format as it will not erase the SD card. A full format will place boot data into the card and then erase everything else, the reason it takes so long. Also make sure the allocation size is 16k byte since our image files are 9k, making the allocation size smaller adds a little extra complexity to the program.
The next step is to place some folders with images files inside them to the SD card, not too many as you need to understand the structure first. I will be using this SD card for my engine ECU project hence the folder names.

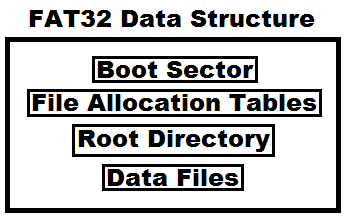
Before we look into the files we must first know how they are structured, now there are four main sections to the FAT32 system. Firstly the boot sector tells the operating system that it's FAT32, that we have 16k byte per cluster and various other stuff, this can be skipped for our microcontroller. Remember I set the allocation unit to 16k byte, this means 16k per cluster, since each memory block / sector is 512 byte it means we have 32 sectors per cluster. The file allocation table tells us which clusters are available, in use or otherwise. The root directory points us to other directories or files. Then there are the data files, these are either other directories or our media / data.
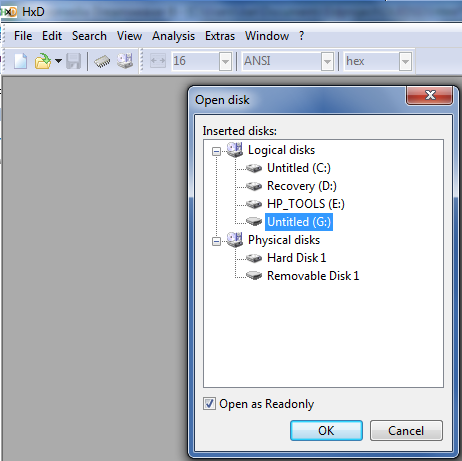
There are normally two copies of the boot sector and two copies of the file allocation table, this was a precaution to prevent corruption. To find our file allocation table we must first open our SD card, click on the icon that says "open disc" and then choose the correct one.
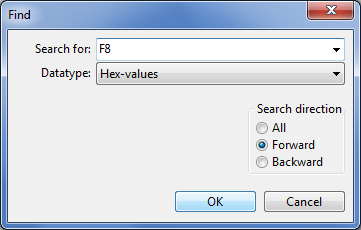
To find our allocation table we must first skip ahead one cluster, 32 sectors, then in the search box we need to find "F8" in hex.
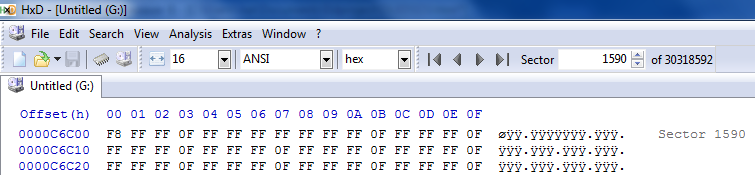
The search will bring us to something like this, each four bytes will represent a cluster, therefore we have a total twelve in this example. For this SD card it starts at sector 1590, there is also a copy of this table at sector 8987. The first two clusters do not mean anything and can be completely ignored, cluster 2 is the root directory cluster and the clusters after that are either other directories or image files.
To make sense of what these values mean we must translate from the following table. All data that is longer than one byte follows something called "little Endian" which means the least significant byte comes first. As you will find out later there is a maximum of 512 entries to the root directory, reading the allocation table allows us to point to the correct cluster if we need to extend it.
| Cluster Value - Hex | Description |
|---|---|
| 0x?0000000 | Free |
| 0x?0000001 | Reserved |
| 0x?0000002 - 0x?FFFFFFF | Multiple Clusters |
| 0x?FFFFFF6 | Reserved |
| 0x?FFFFFF7 | Bad / Corrupt |
| 0x?FFFFFF8 - 0x?FFFFFFF | Last Cluster |
The next search is "E5" which will point us to our directory, this is not the actual beginning of the directory but a deleted entry. Just creating a new folder starts one entry and then renaming it creates another entry. What is important is that each entry consists of 32 bytes which is information such as it's name, data quantity and the location offset of the data. Another way of finding the start of the root directory is multiplying the number of sectors per cluster by the number of bytes per sector, 32 * 512 = 16384.

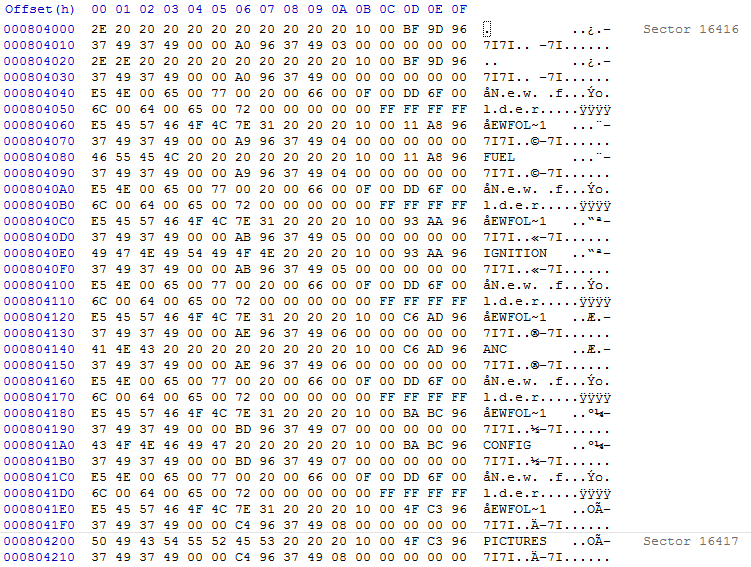
The structure for this data is as follows. The important data is the first character as we need to know if it's a valid entry, the attribute is to know if we're linking to another directory or the file and the cluster offset of the file. Remember back to the file allocation table that each entry represents a cluster and that cluster zero and one were not valid, this is because the location of the root directory is cluster two, therefore cluster three is the one after and so on. Looking at the above location "ENGINE" is the only valid entry, it's attribute is "directory" and it's cluster offset is 00000003 (remember little endian). Since our current position is cluster two it means that the engine directory must be the next cluster, with each cluster being 32 sectors in length we must arrive at sector 16416.
| Root Directory Entry Data Structure | |
|---|---|
| Bytes | Description |
0 |
First character of the file name in ASCII, or allocation status 0 = unallocated or E5 = deleted entry |
1 to 10 |
Remaining characters of the file name |
11 |
File attributes, see following table |
12 |
Reserved |
13 |
File creation time (tenths of seconds) |
14 to 15 |
File creation time (hours, minutes, seconds) |
16 to 17 |
File creation date |
18 to 19 |
Last access date |
20 to 21 |
High-order cluster offset |
22 to 23 |
Modification time (hours, minutes, seconds) |
24 to 25 |
Modification date |
26 to 27 |
Low-order cluster offset |
28 to 31 |
File size |
| File Attributes | |
|---|---|
Byte Value |
Description |
00000001 (0x01) |
Read-only |
00000010 (0x02) |
Hidden File |
00000100 (0x04) |
System File |
00001000 (0x08) |
Volume Label |
00001111 (0x0F) |
Long File Name |
00010000 (0x10) |
Directory |
00100000 (0x20) |
Archive |
Skip ahead to sector 16416 and we can see our new directories as shown in the recent file paths when we saved to the SD card. Looking through each of the entries we can pick out "FUEL", "IGNITION", "ANC", "CONFIG" and "PICTURES" as valid entries. There is a huge build up of deleted entries taking up space, since these are marked as deleted they will soon be overwritten, a disc defragment will also remove them.
We want to work our way to the cat pictures, following the cluster offset we arrive at the following. We can now see that the attribute tied to this entry is an archive, we have now found the location of our image. Remember when we saved our image file we had the option to select "Read only", "Hidden" or "Archive", it doesn't really matter which one we chose.
![]()
Following the cluster offset we arrive at a bitmap image as the first two characters are "BM". Assuming that we have the correct offset the image should be "CAT2".

Now you should have an understanding of how the FAT32 system works and how directories and files are allocated, on the next page I will discuss how to read our image from the SD card and send it to the display.
Hello, if you have enjoyed reading this project, have taken an interest in another or want me to progress one further then please consider donating or even sponsoring a small amount every month, for more information on why you may like to help me out then follow the sponsor link to the left. Otherwise you can donate any amount with the link below, thank you!